Home › Forums › Talk Hockey › Daily Drill Section Thirteen › Reply To: Daily Drill Section Thirteen
 Tom Molloy
C6 1-1 to 2-2 – D Join F Backcheck – Multiple Examples
This is one of the most commonly used drills that I have seen used by pro, junior, international teams around the hockey world. It is usually done 1-1 to a 2-2 but other variations are possible with the same flow. There are 3 video examples. Two with Flames teams from different seasons and one at an NHL prospect camp. The coach can duplicate the same situation in a transition game by having the D join the next rush and the F backcheck but I don't see this done much even though it is more game-like.
This drill has a great flow and transition from offense to defense and visa versa and lots of possibilities to practice skills and game situations:
Instead of defense and forwards have everyone play both by having half the blue defend at one end and the other half at the other. Reds will be opposite. Now everyone practices all off the offensive and defensive skills needed in the game.
Randomly send out 1 or 2 defenders and 1,2 or 3 attackers. Now the situation is different every time and the players have to ‘Read and Act’ according to the situation. Every numerical situation will be created.
Give a time limit for a rush to score and keep score Red vs. Blue to increase the competitiveness.
To practice loose puck situations practice dump in’s which cause the attackers to forecheck and the defenders to break out.
Key Points:
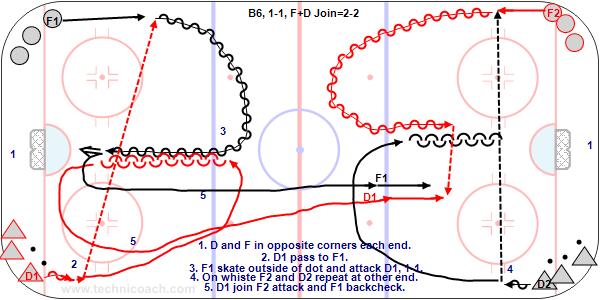
D join the attack on the whistle and attacking forwards back check. It is a fight for inside position. No penalties. Important that the forwards touch the red line so F1-D1 are close enough to join the play.
Description:
1. Blue D1 pass to Red F1 who skates to the red line and turns back attacking 1-1 vs. D1.
2. On the whistle Red D2 passes to Blue F2 at the other end of the rink.
3. Blue F2 skates to the red line and turns back attacking 1-1 vs Red D2. while Red D1 Joins Red F1 on the attack and White F1 backchecks making it a 2-2.
4. Repeat with Blue D3 passing to Red F3 at original end.
*Situations up to a 3-2 can be practiced. You need at least 8 D and 12 F to practice 3-2 with a 5-5 at each end. With larger number the lineup needs to move up to the blue line and start with a pass in the neutral zone.
https://www.hockeycoachingabcs.com/videos/watch/c3-b6-1-1-to-2-2-willy-flames/
C6 – Willy 1-1 to 2-2 – Pro

Another example with the Flames.
https://www.hockeycoachingabcs.com/videos/watch/c6-1-1-to-a-2-2-pro/
C6 1-1 to a 2-2 – Pro 2

Prospect camp.
https://www.hockeycoachingabcs.com/videos/watch/c6-1-1-to-a-2-2-prospects/
C6 – 1-1 to 2-2 D Join F Backcheck – Prospects

https://www.facebook.com/518555930/videos/pcb.825854298324369/218222880169798
C6 1-1 to a 2-2 – Pro

This is an example with a pro team in Europe expanding the drill and doing 1-1 to 2-2, 2-1 to 3-3, 2-2 to 4-4 and 3-2 to 5-5
It is a great way to practice all of the situations on team offense and team defense.
C6, 1-1 to 2-2, 2-1 to 3-3, 2-2 to 4-4 – RB Pro

https://www.facebook.com/518555930/videos/pcb.825854298324369/878576493010158
Attachments
'The Game is the Greatest Coach'
'Enjoy the Game'